Sunday, August 3, 2008

Nifty Chest Fridge

A while back I wrote about my chest freezer/fridge. I was about to start making Canadian Bacon and try out that New York Times chocolate cookie recipe when my wife decided that she needed our chest fridge to switch over to freezer mode.

What should I do? What could I do? She needed to store some prepared goodies for our son's fifth birthday party next week. I couldn't say no.

For months, I'd wanted a second unit. Oh yes, I craved it. Only problem? I couldn't justify it. Especially with my thrifty wife.

Now, my wife herself handed me the leverage I needed. Yes, the second unit will be mine. Mine, I tell you! That, of course, is what I was thinking at the time. The unit is plugged in, cooling things nicely already.


It's just like the first, except twice the size. It doubles as both a freezer and a fridge. Oh so great. I love the chest configuration.

It's also just the perfect size for my large stainless steel chafing/steam table dishes. It couldn't have been better had I planned it myself.

Now I have the room I need (and deserve!) to start trying out things that require a few hours to a few weeks of refrigeration.

I'm so easy to please. If I weren't so happy about my new fridge, I'd lament how easy I am.

Friday, August 1, 2008

Shortcuts ... Bad

It's good that my ego is very large, so it can take the blows of failure. I tried making some soft pretzels today from a recipe I'd found. Oh, it wasn't good.

I like them. But, I like just about any bread product.

My main supporters, my family, normally enthusiastic about what I make ... oh, the pain ... let's just say that my son came through for his dad and liked them. He was the only one.

Do I blame the recipe? Do I blame myself? A little blame goes on the recipe. But, most goes on me. I picked a recipe that took a shortcut past the boiling stage. I had a feeling that it wouldn't go well.

So, mostly my fault for picking a recipe that I thought probably wouldn't work.

The lesson we can all take away from this: don't be lazy!

Thursday, July 31, 2008

Knife Magic

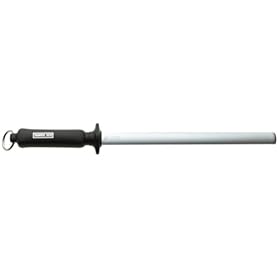
I like keeping my knives sharp. Not just a little sharp. Really sharp. As in, don't drop the knife on your foot because it'll slice through the bone (almost) sharp. As such, I religiously use a steel to keep my knives honed.

Many years ago, on a lark, I put a diamond-dust coated Wüsthof steel on my Amazon wanted list for Christmas. I never thought anyone would get one for me. Much to my surprise, my dad bought me one.

It was love at first use! Oh, my blades went back to straight, true, slicing through tomatoes like Ginsu knives promised they would.

I loved my steel. When I packed it to come here to the Philippines, I packed it well. Packed it to protect against getting banged up, bent, scratched, etc. I forgot about one little thing ... the ocean salt air. See, most of our household items went across the Pacific in big containers. So, they were exposed to the ravages of the nasty, salty air.

My steel, my poor steel, arrived DOA. Dead. D-E-D, dead.

Of course, my knives became more and more dull. Didn't cut like they should. And, that's frustrating. Finally, I said ENOUGH! I'm mad as hell and I'm not going to take it anymore! (actually, it was more like ... hmmm, let's see what's out there that I can get shipped here quickly ... but, that doesn't sound quite as cool and outraged).

While I love Wüsthof products, I thought I'd give Henckels a try. I'd heard many good things about them over the years, but had never purchased one of their knives. I decided on a J. A. Henckels 10-inch Diamond Sharpening Steel. The price was reasonable at $39.95 (reasonable for a steel coated in diamond dust that is).

It took three weeks. But, the steel finally arrived. Was the Henckels steel as good as the Wüsthof? Did I immediately fall in love with it, eschewing the many years of loyalty from my old steel?

Yes! YES! My knives are sharp and honed again! They slice through nearly anything with ease. This is so great. I'm back to sharp knife happiness.

One small caveat with an aggressive steel like this one: it wears out the knife faster. However, if you're an amateur chopper like me, it makes little difference. And, what difference you do see is more than offset by having knives stay sharper, longer.

Highly recommended. I love it.

Wednesday, July 30, 2008

Must Make List

This is a collection of recipes I have and links to recipes on other sites that I simply must cook. I'm sure it will grow faster than I can cook the items.

Chicken Pot Pies - The picture on this blog is just gorgeous. Unfortunately, I can't just buy puff pastry here. So, I'll have to make the crust from scratch. I'm pretty sure I've got a recipe here somewhere that'll do.

Savory Potato Biscuits - Wow, who can say no to potatoes and cheese with some sour cream? I can't! My problem with this recipe is that it calls for making them in the microwave. I'll have to figure out how to cook them in the oven.

Potatoes Baked with Parmigiano - Potatoes, cream, Parmigiano Reggiano. Sounds like a dish from Heaven. Only one issue here: Parmigiano Reggiano. Just a little hard to find here. OK, no a little, impossible. I'll use the shredded and bagged variety. Can't skip this one.

Cinnamon Rolls - These look so good. And the recipe looks so easy. No excuse not to make them. I think I'll leave out the coffee. Not a fan.

Mini Stuffed Pizzas - This is a must. I'm going to have to work up to these. Good ingredients here? Rare. Going to have to learn how to make good pepperoni and good Italian sausage. For that, I'll need fennel seed ... again, not available here. More importing.

Pepperoni - We can't even buy the packaged stuff here. This recipe looks pretty good. I like that they slow-bake the meat and not cure it over 6-8 weeks. I'd rather not have to build a smokehouse just to have pepperoni.

Italian Sausage - More required food for pizzas. And, especially required for me. My favorite pizza is Canadian Bacon and Italian Sausage. Simple, flavorful.

Apple Crumble - I haven't had this in years. Yet, I can still remember just how good it is. Getting good apples here isn't too hard, just a matter of finding them at the mercado ... catching a vendor when they first come in. The more difficult part will be adjusting the recipe for local sugars. We don't have American-style brown sugar here. There is normal granulated sugar, turbinado sugar, and some other darker sugar. I'm sure I can figure it out. Just a matter of making and eating a few batches. Oh, the horror! Hehe.

Herb-Baked Eggs - I love eggs. I love good herbs. Toss in some cheese and I cannot resist. This calls for heavy cream. Wait a sec, can't type, laughing too hard. OK, back. Yeah, heavy cream isn't happening here. I'll have to figure something out with evaporated milk or one of the other less-than-high-quality dairy products we do have here.

Macaroni-and-Cheese - If pressed, I'll admit that I like the Kraft boxed mac-and-cheese. I even like it with extra cheese powder. Industrial? Oh yeah. Yummy, more so. Still, there is better. This recipe looks really good. I've tried Alton Brown's mac-and-cheese (he's my favorite food personality, love the science he throws in) and wasn't too thrilled with it. Normally, I love his stuff, just not this time. I'll probably make this without the ham as I don't have a source for good ham here.

Soft Pretzels - What else is there to say?

Crispy Yogurt Chicken - Wow, that looks good. I just started making yogurt here, too. This will be perfect. I love panko, too!

Roast Pork Loin with Potatoes - roasted meat and potatoes? It's definitely one of the World's Most Perfect Meals.

Chicago-Style Deep Dish Pizza - Wow, this guy makes it and makes it look amazing. I can only hope that mine would be close. Need to dig out some cast iron for this!

More to come as I sort through my bookmarks ...

Tuesday, July 29, 2008

Ham-and-Cheese Bun

The Barbecue Pork Buns that I made were a big hit. So, I decided to build upon success. After all, if Hollywood can release sequel after sequel, so can I!

I'd planned to do cheeseburger and bacon cheeseburger buns. Unfortunately, the local meat shops were out of ground beef and had been for a few days. This is one of the drawbacks of living in the semi-rural Philippines. And, don't get me started on fennel seed ... I spent three hours yesterday looking all around town for that only to find puzzled faces.

So, I decided to make a ham-and-cheese variant of these yummy stuffed buns. The problem was that I couldn't find any good cheese in town for sale. They go in cycles of availability here and I'd run out of my stock from the last cycle.

I tried a few experimental buns with Quickmelt and Kraft "Cheddar" (it's a brand name here, not real Cheddar cheese). Both of these are a notch or two below Velveeta on the cheese-quality scale and definitely count as industrial food.

Both were pretty bad, so I feel back to Cheez Whiz. Yes, Cheez Whiz was the best I had available to me.

Making the Buns

I used the dough from the original recipe. For filling, I chopped up some ham and mixed it with Cheez Whiz and a teaspoon of corn starch to thicken slightly.

I experimented with the sizes of each piece of dough. Last time, one of the testers complained that there wasn't enough bread in the buns. She was right. I'd been rolling the dough rather thin to get it to the right size.


Rather than doing that, this time I increased the amount of dough used. And, rather than relying on skill to roll to a specific thickness, I relied on my kitchen scale. After some experimentation, I ended up using 100 grams per piece of dough. I'd roll it out into 6-inch circles.

Each bun used two pieces of this dough. On the bottom piece, I put a small stack of the ham-and-cheese filling. I left a half-inch all around.

Then, I put the second rolled-out circle on top and sealed the two together by pinching and rolling. When I put the finished bun onto the parchment-lined baking sheet, I turned it over to hide the seam.

Again, 15-20 minutes at 350F (175C). When the bun comes out of the oven, immediately transfer it to a cooling rack and brush the top with melted butter.

Test Results

Primary Test Group: Marasa, very good. Eaten up quickly.

Test Group C: Liked very much. In fact, while we were sitting there talking, we popped open the bun intended for Test Group J and ate it, too.

Test Group M: Still waiting for feedback. Will post when I have it.

Potential Improvements

Better filling. The ham that I was able to buy was more like sandwich meat and not a good ham. And, while Cheez Whiz has better flavor than the other cheese-like products I used, I want better. I'm thinking a medium Cheddar with maybe a little grated Parmesan.

Since better ham isn't available locally, I'm probably going to have to learn to make it. I'm hoping I can get away with a wet method as I don't have a smoke house. Although, this is a nice excuse to build one!

If not ham, Canadian Bacon. Like ham, but made from the loin rather than a hind leg.

I'd really love a honey-baked-like ham. That would just be great.

Conclusions

As I said in the first post, this bread seems bullet-proof. The range of fillings that can go into it are nearly infinite. Going to have fun trying combinations.

Monday, July 28, 2008

Banana Bread Test Results

A few days ago, I posted about some banana bread that I made. So yummy, brought back good memories. Well, the results are in from the various tasters.

Test Results

Test Group C: Wanted more to "properly test".

Test Group J: Quite good.

Test Group M: Delicious.

Random Test Group: I took a loaf to a meeting I had. Everyone loved it.

I do so like it when my work is appreciated. It feeds my not-so-inconsequential ego.

Snickerdoodles

Ah, Snickerdoodles. Such great cookies. They have a taste that reminds many of good pancakes. And yet, you can hold them in your hand, take them with you, eat them piles at a time next to the ocean.

OK, you can do that with any cookie. I guess I just love Snickerdoodles. So, when my mom asked me to make some, I obliged.

How could I say no? Not only did she ask, but she provided the recipe. It's nice when people make it so easy for you.

Cookie Dough
  • 1/2 cup butter
  • 1/2 cup shortening
  • 1-1/2 cups sugar
  • 2 teaspoons vanilla extract
  • 2 eggs
  • 2-3/4 cups all-purpose flour
  • 1 teaspoon baking soda
  • 2 teaspoons cream of tartar
  • 1/4 teaspoon salt

Mix the butter, shortening, and sugar well. Make sure that they are thoroughly whipped together. Takes a few minutes in the mixer on medium.

Then, add the eggs and vanilla extract. Mix thoroughly again.

Finally, add the flour, cream of tartar, baking soda, and salt. Blend well, but not too long. Stop when the dough is smooth and appears that everything is well mixed in. Mixing too long will start to form gluten. That would be bad. These cookies have a somewhat cake-like texture that would be destroyed by gluten production. A crime in many countries!


Here's the hard part: chill the dough in your fridge for at least two hours. Yes, you have to wait. Go watch TV. Go sleep. Just put it in and walk away. Your patience will be rewarded.

The dough tends to be very sticky unless refrigerated. Very hard to work with. Here in the Philippines, the dough is nearly impossible to work with unless chilled well.

You can pass a little of the time while waiting for your cookie goodness by making the cinnamon coating.

Cinnamon Coating
  • 3 tablespoons sugar
  • 1 tablespoon ground cinnamon
Put both into a small bowl and mix thoroughly. You want to mix until it is the same color all through.


Putting It All Together

Hopefully, it's a couple of hours later and your dough is chilled by now. Preheat your oven to 400F (200C). Get out your dough.

In the picture, you can see some dough that had been allowed to get too warm. It was very difficult to work with. Very sticky and soft. So, be sure to chill the dough thoroughly! In a high heat environment like here in the Philippines, take out enough dough for each batch and leave the rest in your fridge.


For each cookie, scoop out a small piece of dough about 2 tablespoons in size. I measured each piece to be 50 grams on my kitchen scale (love that thing!). Roll it between your hands into a nice ball. Then completely cover the ball in the cinnamon-sugar mixture.

Place the cookies a couple of inches apart on a baking sheet. I use parchment paper. A silicone baking sheet will work great, too.


Bake for 8 minutes. Yes, that's not a range of time. Bake for 8 minutes. And longer and you end up with burnt nasty cookies. Eight, 8, ocho ... minutes.

When they come out of the oven, take them off the baking sheet immediately. You do not want the bottoms to continue to get all that heat. Remember, there's a cinnamon-sugar coating on it. That will burn and taste horrid.

You can see in the picture to the left that the cookies grew together. That's because the batch was with dough that was not chilled enough. The cookies spread out too much because the dough was soft to begin with. Still, they were delicious!


Here are the final products packaged and ready to go to the testers ...

Test Results

Primary Test Group: Consumed with zeal. Loved the cookies and demanded more.

Test Group C: Marasa (tastes good). Had the usual complaint that I did not deliver enough of the test food for them to enjoy. When asked how many I should bring next time, reply was "two dozen".

Test Group J: Very good first batch. Cookies were a bit too soft and crumbled. Still, delicious.

Test Group M: Very good. Enjoyed. Wanted more.

Potential Improvements

Chill the dough more. Only bring out enough dough for each batch while forming the cookies and baking.

Conclusions

Winner. As far as I could tell, everyone liked these.