Friday, December 26, 2008
Dim Sum - Baked Chicken Curry Hum Bao
More Christmas Dim Sum! A soft, slightly sweet bun stuffed with chicken curry. A delightful, delicious surprise inside an already tasty bun.
I love these. Baked hum bao (baked buns) are the first Dim Sum that I tried. I fell in love immediately. Soft, sweet bun willed with delicious Chinese goodness.
This is the food that eventually led me to loving Dim Sum and Chinese food in general. When finding good sources of these delicious culinary treasure boxes, I ran into many other Chinese delicacies.
This recipe is from a book that's currently in print, so exact ingredients and quantities are again left out. This is from Dim Sum: The Art of Chinese Tea Lunch by Ellen Leong Blonder. This is a great cookbook. Definitely recommended
Procedure
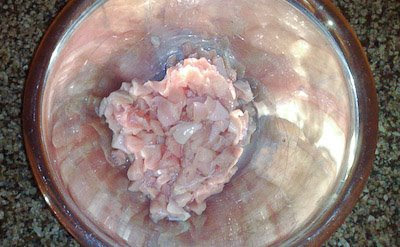
I thoroughly diced some boneless, skinless chicken breast.
Then, I put the chicken into a frying pan for pre-cooking. Baking these is like cooking pizza ... the meat needs to be cooked before going into the oven. The bun don't spend enough time in the oven to cook the meat properly.
Like the spatula? I love my silicon spatulas. Solid, single-piece ... can take really high temperatures. They don't get hot, either. A very cheap luxury. Highly recommended!
I sliced (and later diced) some carrots and onions. The purple circles on the left are slices of a local onion. They're quite small. And, as you can see, the local carrots are quite large.
Diced onion, crushed garlic, and diced carrots go into the frying pan for some softening. Oh, the smell was fantastic.
Here's the rest of the ingredients for the filling. Some peas, curry powder (of course), salt, and a few other spices.
I tossed everything into the bowl and mixed thoroughly.
I didn't need this for a few days. So, I put it into a zip-top bag for storage in the freezer.
I used to use tape on the bags to label them. Now, I just use a permanent marker to write directly on the bag. Works great.
It's now a couple days later and I'm ready to make the buns. The dough starts out like any decent, soft, heavenly bread with some shortening and flour. I used a pastry cutter to cut the shortening into the flour.
After cutting in the shortening, I added the rest of the ingredients to the dough ... a little sugar, salt, yeast, all the usual suspects. I'm not a fan of kneading bread by hand, so into my mixer it went. 10 minutes of thrashing by my well-used bread hook.
Like all breads, this one needed to rise. About an hour until the dough doubled. Your results may vary as room temperature here is fairly warm (80F / 27C).
I rolled out the dough into a rectangle. About twelve inches by nine inches.
I divided the dough into twenty four little pieces. I sliced it into approximately three inch square pieces. That yielded a dozen pieces. Then, I cut each piece in half.
I formed each piece into a small circle. The edges of the circle I made thinner than the center. The edges will form the bottom of the bun. If the edges are the same thickness as the center, the filling in the finished bun will be sitting atop a large piece of dough.
For each little bun, I put a heaping spoonful of filling in the center.
I folded two edges over the filling and pinched.
I folded the other two edges over the center and pinched.
I brought the four corners into the center and pinched to seal everything.
Finally, I twisted the center to seal completely. Sorry about the fuzzy photo. I only noticed that it was fuzzy only long after I finished.
Twisting the bottom ensures that the contents are sealed. It also creates some tension on the top of the bun. This helps makes the top smoother.
I turned over each bun and placed it onto a piece of parchment on a baking sheet.
I brushed each bun with an egg wash. Then, into the oven for about 20 minutes.
Just look at those beauties as they came out of the oven!
Here are the buns as they were packed. Look at the golden tops, the shine. The promise of good things to come upon biting into them.
I was so happy when these came out of the oven. Look at the golden tops. The bread was soft and sweet. Just like I remembered.
Test Results
Primary Test Group: Delicious kuya! Marasa!
Test Group Rotary: Eaten quickly and heartily. Many questions about how it's made. Requests to make again.
Potential Improvements
These turned out very well. Unfortunately, they were a bit small. Next time, I'll make a dozen buns from the recipe and not two dozen.
Potential Variations
The fillings for these are quite varied. Most savory, some sweet. One can also steam these.
Personally, I want to fill them with BBQ pork. So very, very good.
Conclusions
I love these. Most people love these. I'll make them over and over. I recommend that everyone try!
If you don't make them, at least go to your local decent Dim Sum restaurant or Chinese bakery and get some hum bao. If you're new to eating these, start with char siu bao (Chinese BBQ pork-filled buns). They're really the best!
Labels:
dim sum quest,
recipes - bread,
recipes - meat
Subscribe to:
Post Comments (Atom)


1 comment:
The combination of dim sum and baked chicken curry sounds intriguing.
Post a Comment